vrijdag 15 februari 2013

New gelnail design -> aqua nails**

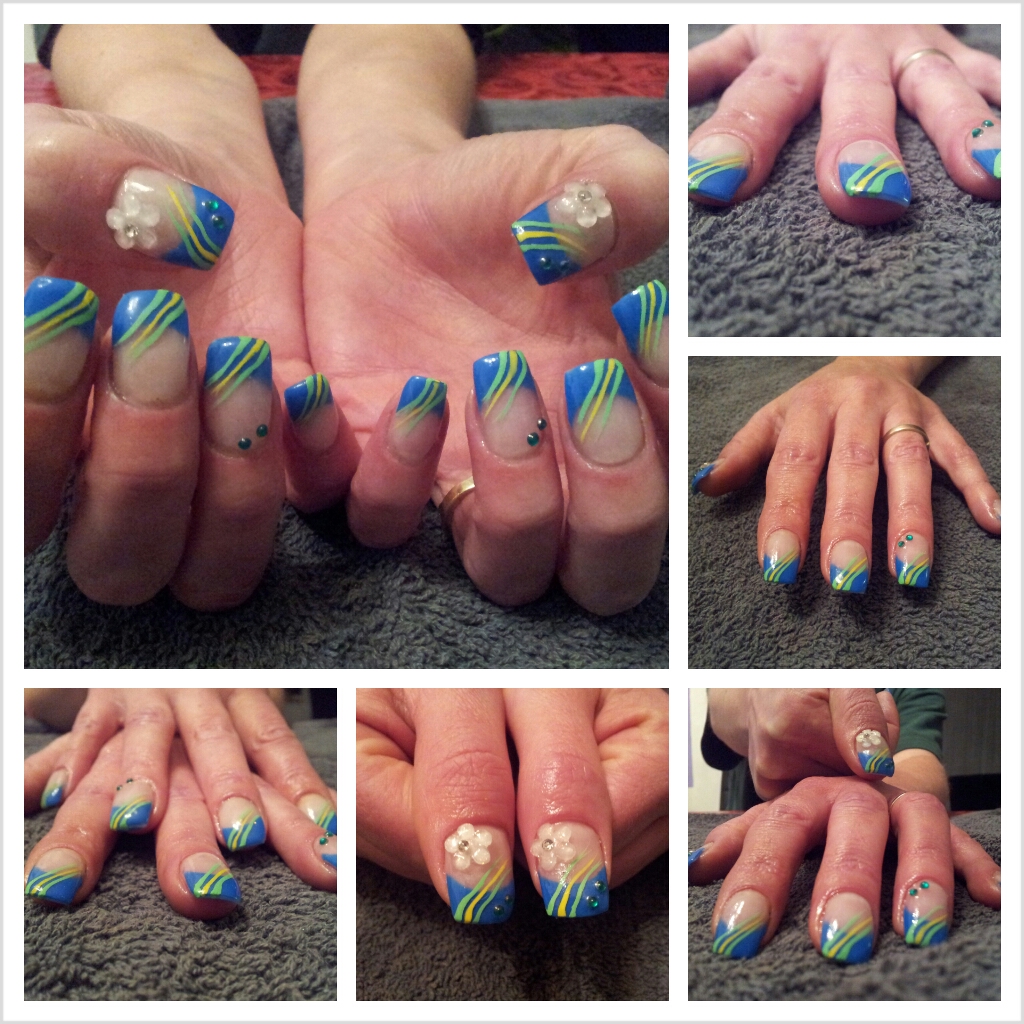
I <3 creating gelnails and today I designed a new set. I haven't done a design like this before, I just started drawing with acrylic paint and this is the result!
I did make a HUGE mistake... As you can see I put the nailart on each nail on the inside, so each stripe goes the same way and so on. I should've done the nailart on the right hand as a reflection of the left hand (see example below)


Step 1: prep
When you're doing gelnails your prep needs to be very thorough and done carefully. Spray your nails with nail dehydrate. Push back your cuticles (carefully, you don't want to hurt your client. And keep your tool flat at all times.) and scrape away the dead tissue. Then it's time to start fling your nails. Allways file one direction only, or you can harm the natural nail. Shape the nails with your file (best is a 240 grid file) and then buff the top of your natural nail with a whiteblock, or a 240 grid file. You don't need to put pressure on the file, just let it flow over the nail. DON'T file too mutch. You will file off layers of your natural nail and cause great damage. Filing is necessary as gel won't stick to a shiny surface. Now remove your dust. Now apply a little bit of prep, and let it dry. Then apply your primer round your cuticle area. (after you've done this don't touch the nails)
This nails were done on natural nails, so I didn't use tips. I'll do a  tutorial on how to apply tips later.

prep, primer and cleaner
cuticlepusher and cuticlescraper

whiteblock


Step 2: apply gel
1. I'm using a 1fase gel (or 123gel) so I have one type of gel for all the gellayers, and I also use a pink natural gel. Start off with one thin layer of pink gel. Apply it with your gelbrush. Just brush over your nail until your whole nail is covered with gel. Take a woodstick and remove the gel from around the nail so it won't go into your cuticles. Let it cure in a uvlamp for 2 minutes.

natural pink gel


2. I did this nails as an infill on natural nails. If you want longer nails you'll need to use tips or forms. I'll do a tutorial on this later.

3. Apply a thicker layer of gel on your nail, and make sure you create a nice natural curve. So you'll need to apply a thicker layer behind your free edge. Clean up around the edges with your woodstick and cure for 2/3 minutes.

woodsticks


4. Apply your blue gel. Just brush it on your nail around the free edge and try to make a nice "c-curve". You can also do this by taking a clean gelbrush and just brush the gel in the shape you want. I'll post a video about this technique later. Just try to start at the side, and brush in a circular move towards the other side. Cure for 3 minutes and then apply another coat. Cure again for 3 minutes and remove the tacky layer with gelcleanser and a wipe.


Step 3: apply clear gel
Apply 1 or 2 more layers of clear gel and clean up around the edges, cure and so on.


Step 4: file
File with a 240grid file to make sure you don't have any bumps or ridges and make it nice and smooth. Remove your dust and wipe with gelcleanser. Don't file too much because it will get hot and you can hurt your client.

180grid and 240grid file

dust brushes


Step 5: nail art
Take a nice green and yellow acrylic paint and apply a little water. Take a nail art brush, best is a very thin, long brush. Take some paint and make some nice lines, they don't have to be straight. Make 2 green ones and a yellow one in the middle. The paint will dry for itself, and will take about 2minutes for it to be completely dry. Then place 2 tiny drops of glue on the side of your free edge and place your stones. On the thumb I placed a lovely flower, apply that too with a drop of glue (nail art glue!).

nail art brushes


Step 6: apply topcoat
Apply your uv sealing topcoat nice and thin and make sure you did the whole nail. Cure it under the lamp for 3 minutes (depends on which topcoat you're using). Remove the tacky layer.


Step 7: oil
Apply some cuticle oil and some handcreme. Massage it in.


Voila, your nails are done! I hope you liked it!

xoxo


vrijdag 8 februari 2013

How to create newspaper-nails

Today I'll tel you how to create easy and cute newspaper nails. I can't upload videos yet, because the harddisc of my laptop is broken so it's very slowww... I'll try to upload vids as soon as possible!


Here are the simple steps:


1. Prep
Give your nails an easy prep. It  doesn't need to be as thorough as with gel or acrylic nails. Just push back your cuticles, and just scrape away the dead tissue a little bit. Then file your nails in the shape that you want, one direction only, and buff, just a little, on top of the nail with a whiteblock. Remove the dust with a brush.

2. Basecoat
Begin with a (strengthening) basecoat to protect your natural nails and let it dry. Basecoats tend to dry 
pretty fast.

3. Polish
Paint your nails any color you want, I chose a grey/ brown-ish color. If necessary apply 2 coats of 
polish.

4. Let it dry!
And make sure it is completely dry before you start with the next step. It's best to wait too long than too short, because if the polish is still a little wet, the next step won't work properly.

5. Apply newspaper
Select 10 tiny pieces of newspaper, best is to pick pieces with small letters. Just cut or rip them out of the newspaper. Then you'll need some alcohol. This technique is also possible with water but alcohol works way better! Just dip your nails, one by one, in the alcohol, or tap your nails with an alcoholpad. Hold it there for a couple of seconds and then remove it from the alcohol. Then press your piece of newspaper firmly on your nail and hold it for at least 10 seconds. Make sure every piece of your nail has newspaper on it. You can choose to apply a little bit more alcohol on top of your nail with the newspaper.
Now release the piece of newspaper and tadaahh.. You now have cool newspaper nails.

6. Topcoat
Just finish of with a sealing topcoat to protect your design.


I'm sure you'll amaze your friends with this cool design. Good luck and let me know if you tried it!


xoxo


Commentzz

Please feel free to leave a comment! Ask me a question, and I'll try to answer it for ya. I'd also like to know if you tried one of my manicures/ designs and maybe  you can post the results!? :)

I hope to hear from you guys!

xoxo

woensdag 6 februari 2013

Manicured my mother


Today I gave my mother a simple manicure. I did a simple one because we didn't have much time. 


Here are the simple steps:

1. Sanitize + disinfection


Wash your hands and let your clients wash their hands. Then disinfect your hands (and again your clients too). A simple disinfection gel is good enough.
You can choose to dehydrate your clients nails with nailcleaner.


2. Cuticles
Gently push back the cuticle with a cuticlepusher. Mind that you keep your tool flat at all times so you reduce the pressure on the nail, because this can hurt your client. Then gently remove the dead skin and unnecessary cuticle skin. You can do this with the other side of your cuticlepusher or with a cuticlescraper.

cuticlepusher and cuticlescraper


3. Filing
Gently file your clients nail (best is a 240 grid file) and one direction only, or you can damage the nail. Just file a little on top, and then file the free edge in whatever shape the client prefers. When you're done with this, use a whiteblock and buff the nail, again, one direction only. Remove your dust with a brush.

glass file and 240grid file


4. Strengthening basecoat
I chose to use a strenghtening basecoat on my mothers nails because she had pretty weak nails, probably because of the cold weather. I applied one coat.


5. Polish
Let your client decide which polish they prefer. My mom likes the casual, discrete but cute types of nailpolishes, also for her work. She chose a simple glitter polish.  This polish only needs one coat, but it depends on how many glitters your client wants and so on. A colored polish probably needs two coats. Finally when your polish is dry, apply a shiny topcoat polish (you can also use a sealing uv topcoat, if you have a uv lamp).


6. Creme and oil
When your polish is completely dry, apply some handcrème on your clients hands and rub it in, and why not give a little massage? Then put a drop of cuticle oil on each cuticle and rub that in too.


Voila, your client has beautifull, clean, soft nails and hands!

I hope this helps


xoxo


maandag 4 februari 2013

Welcome to my blog!


Hi Guys!


And welcome to my blog! In here I'll be posting stuff about manicure, nail-art, gel nails, make-up and so on! I'll try to update my blog as much as possible and I hope you will enjoy!

xoxo